About 6 weeks ago I posted about the saga I’d had getting DCC control working, and that I’d had to resort back to a very old desktop computer because of the issues I’d had with Windows 10. Since then I’ve been trying reduce the amount of equipment needed to make a train work using DCC and purchased a Raspberry Pi to replace the computer. On paper (or in my head anyway) it all sounded so easy……
For those that don’t know, the Raspberry Pi is a very basic computer that costs around £30, to which you need to add basic things like power supplies and a memory card. It doesn’t run Windows, but instead the main operating system is a customised version of linux. The result is not something that you would use as a desktop, but for small jobs such as a media player, or how about controlling a model railway!
The first attempt I made on the Pi I already had kicking around which was the very first model released back in 2012. At that time I bought it to play with and never really found a particular use for it, however the model railway was always in the back of my head. The original version was not very powerful at processing, so after installing all the latest versions of the software it would get part way through loading and then freeze entirely and give up. So I decided it was time to splash out on a new Pi 3 (model B) and give that a go.
It was when the new unit turned up I really started to feel that DCC and I were not meant to be…. I bought a starter pack which included the power supply, case and pre-loaded memory card (well I could have loaded it but it was cheaper to buy one as part of the set) since I needed all the pieces ultimately. However on powering up I discovered that the memory card I’d been sent was faulty and nothing would load.
So after sending back that Pi and ordering again, I tried again for the 3rd time! This time I had more luck and with various amounts of fiddling about and a bit of googling I managed to get the Pi up and running, JMRI installed and talking to the Sprog and control of a train! (More detail on the steps on how to do it below.)
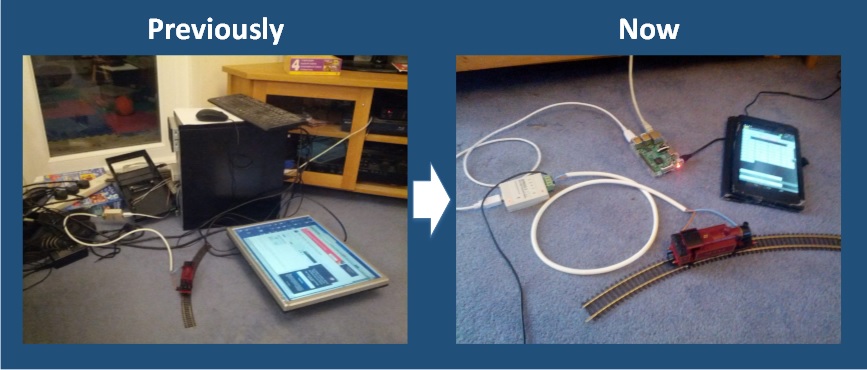
This means that I’ve managed to get the pile of computer hardware required to control the trains right down from the huge pile in the last post to something I can mount on the underside of the railway and control via my tablet.
The next stage is going to be get this onto the layout and try using a DCC train up there in reality. I also need to start to add chips to a couple of my locos which have the DCC sockets and I’ve bought the decoders for. Then I’ll really start to make some progress.
The next stage after that will be to have another attempt with my Arduino’s to make a low cost accessory decoder to control the turnouts (points) and eventually even lighting and signals. My last attempts failed miserably, but this was before I discovered all the Windows 10 issues. So hopefully this time it will go better.
The installation process
This piece is probably only interesting to those who might want to set up the Pi and Sprog setup. While there are various examples on the internet (many of which I’ll reference here), I didn’t find one that included everything I needed. So here goes……
The first stage is to power up the Pi and install the latest version of Raspbian which is called Jesse. Since I’d bought a pre-loaded card then all I had to do was follow the new installer that has been added to the latest version to select what I wanted.
Since my aim is to try and use the Pi as remotely as possible and not connect a keyboard, mouse or monitor, then the next stage was to configure SSH access onto the machine. There are some good instructions on how to do that here.
Next stage was to update the machine to the latest version running the usual commands:
sudo apt-get update
sudo apt-get upgrade
Many of the instructions I found said to install Java at this point, however I found that the latest version was already installed in the new build of Raspbian, however it’s probably still worth running the following command to be sure:
sudo apt-get install oracle-java8-jdk
Next up was to install JMRI itself. You can do this manually however following instructions I found on the nscale forum then it appears that someone has written some handy scripts that do pretty much all the work for you and published them to Github. So you just need to do the following:
sudo apt-get install git
git clone https://github.com/proffalken/JMR-Pi
cd JMR-Pi
sudo ./setup.sh
This would be enough if you’re using the Pi directly, however since I want to run it headless and control it remotely, then I needed to install the xrdp package to run the remote desktop on the Pi.
sudo apt-get install xrdp
Finally it appears there is an issue with xrdp and some of the default VNC servers on the latest version of Raspbian. As a result I needed to install another VNC server onto the machine.
sudo apt-get install vnc4server
sudo service xrdp restart
At this point I could then use a standard RDP client to connect to the Pi, log in and then run up JMRI DecoderPro. After adding the connection preferences and a little trial and error to get the right USB port for the Sprog then I was able to connect to the track, read the decoder in my test train and control it.
The final stage was to enable the WiThrottle web server, and then using the Engine Driver Throttle on my Android tablet I was able to control the train remotely without needing to touch the Pi other than to start the software.
So in the end, with the right hardware, not having Windows 10 involved, and a little bit of patience I think I know have a system for running DCC that I can look at add to the layout.