So here we go with part 3 of the progress of building a Scalescenes engine shed, but not just one of them, but three joined together to make a larger shed. If you’ve not already done so then it’s worth reading through parts 1 and 2 to make sure you’re up to speed with the background and progress to date…..
Meanwhile work has continued at a typically varied pace. Some times I’ve been working on consecutive nights and making lots of progress, other times there have been longer gaps and therefore much slower.
One of the major components that I needed to make which was the custom centre wall is now complete. This is needed to join the two sheds that run side by side together. Scale Scenes gives the instructions for how to build a double (or beyond) length shed, but nothing about how to put them side by side. Since I’m building three – a double length two track arrangement with an extra single track shed on the side – then this matters to me,
The solution has been to build a custom section of wall to support the roof, but with what would be hopefully more typical open sections to allow people to move between the two sections of the shed. This wall has become a major undertaking as it’s 4 x 2mm sections of card glued together, plus an additional 2mm buttress on either side. Since the sections are so narrow then it didn’t feel sensible to cut them as complete layers, so they’ve been built of pieces glued together. Then using additional printouts of the internal walls these have been covered to match the other interiors.
-
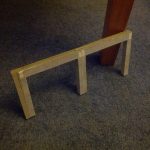
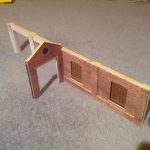
- The new scratch built wall to join the two parallel sheds
-
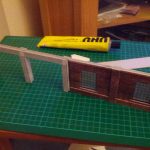
- The new stretch of wall covered and glued to the create the whole length
Since that completes all the walls then the next focus is on the roof. This is where you really start to appreciate the engineering in these models – it’s not just four pieces of card for the walls and another for the roof. If you take the roof trusses as an example then you realise both how detailed and how clever these models are.
The roof trusses are made out of four layers of 1mm card – two facing in each direction. There are the inner pair of layers stuck back to back creating the horizontal and vertical trusses and then the diagonals stick on it them. Once complete it creates something that is both really quite strong, but looks amazing.
I’ve also added some small LEDs to the bottom of the trusses in order the light the inside of the model once it’s on the layout. The LEDs I used were these from ebay. While I knew that LEDs had got brighter and smaller I was still amazed by the size of these when I received them and even more surprised when I tested them with a battery. I’m looking forward to seeing the in action within the model one day.
-

- Parts of the truss part way through being glued together
-
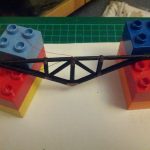
- The completed truss with the LED glued in place
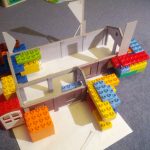
Then it was a case of actually putting the model together. At this point I discovered that borrowing some of my sons duplo was quite useful to hold things in place. One real advantage was that I could create perfect right angle jigs for both inside and outside the corners.
-
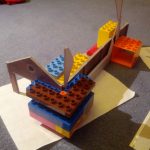
- First sections gluing being held in place with duplo
-
- The custom middle wall now freestanding
-
- The main structure gluing together
-
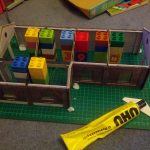
- The roof trusses held in place by duplo while the glue dries
-
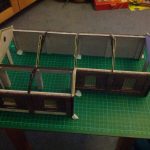
- The main structure of the shed now complete
All that remains now is to glue the roof on and the finishing touches. I’m hoping that the next blog post about the shed will be it complete and ready to take it’s place on the layout!